Monthly Soundproof Room Inspection in Japan | DIY Equipment Check Guide
Learn how to perform monthly soundproof room inspections yourself in Japan. Check ventilation, doors, lighting, and structure in 4 categories with proper record-keeping methods.
“Can I inspect my soundproof room myself?” “What should I check?” If you have these questions, this guide is for you.
You can perform monthly soundproof room inspections yourself. Just check 4 categories once a month for 1 hour. Inspect ventilation equipment, doors/seals, lighting, and structure through visual checks and simple operation tests to detect problems early and avoid major repairs. No specialized knowledge required—anyone can do it.
This article explains how to inspect your Japanese soundproof room yourself, designed for beginners.
Purpose and Benefits of Monthly Inspections
First, let’s understand why monthly inspections matter.
Benefits of Monthly Inspections
| Benefit | Details |
|---|---|
| Early detection reduces repair costs | Find small problems early, avoid major repairs |
| Maintain sound insulation | Monitor deterioration and respond appropriately |
| Extend lifespan | 18-20 year usage possible |
| Peace of mind | Confirm no abnormalities |
- Early seal deterioration detection → Replacement ¥80,000 ($540)
- Neglect leading to major sound insulation loss → Full renovation ¥500,000+ ($3,400+)
4 Monthly Inspection Categories
| Category | Inspection Time | Difficulty |
|---|---|---|
| 1. Ventilation/Air Conditioning | 15 min | ★★☆☆☆ |
| 2. Door/Seals | 15 min | ★★☆☆☆ |
| 3. Lighting/Electrical | 15 min | ★☆☆☆☆ |
| 4. Panels/Structure | 15 min | ★★☆☆☆ |
Category 1: Ventilation/Air Conditioning Inspection (15 Minutes)
Ventilation equipment is crucial for soundproof room lifespan.
Inspection Items and Methods
| Item | Check Method | Normal State | Abnormal Response |
|---|---|---|---|
| Ventilation fan sound | Turn on and listen | Quiet rotation | Clean filter |
| Ventilation fan airflow | Feel with hand | Strong airflow | Clean filter |
| Filter dirt | Remove and inspect | Little dust | Wash with water |
| Air conditioner effectiveness | Test heating/cooling | Works immediately | Clean filter |
| Condensation presence | Touch walls/ceiling | Not wet | Strengthen dehumidification |
Ventilation Fan Filter Cleaning Method
Cleaning Steps (30 minutes)-
Turn off ventilation fan
- Always cut power for safety
-
Remove filter
- Screw or clip type
- Check instruction manual
-
Vacuum dust
- Remove surface dust
- Vacuum both sides
-
Wash with neutral detergent
- Bucket with water and detergent
- Wash gently
- Rinse thoroughly
-
Dry completely (24 hours)
- Dry in shade
- Wait until completely dry
-
Reinstall
- Secure firmly
- Check operation
Air Conditioner Filter Cleaning Method
Cleaning Steps (15 minutes)- Open air conditioner cover
- Remove filter
- Vacuum dust
- Wash with water if heavily soiled
- Dry completely
- Reinstall
Condensation Check Method
Check Locations- Ceiling corners
- Wall corners
- Windows (if present)
- Around ventilation fan
- Wipe with dry cloth
- Run dehumidifier 24 hours
- Strengthen ventilation
- Reduce temperature difference
Category 2: Door/Seal Inspection (15 Minutes)
Doors and seals are essential for sound insulation performance.
Inspection Items and Methods
| Item | Check Method | Normal State | Abnormal Response |
|---|---|---|---|
| Door opening/closing | Actually open/close | Smooth | Oil hinges |
| Door seal | Paper insertion test | Paper won’t pull out | Record, monitor |
| Seal condition | Visual, touch | Soft, no cracks | Record, consider replacement |
| Doorknob looseness | Check wobble | No wobble | Tighten screws |
Paper Insertion Test Method
Test Steps-
Prepare A4 paper
- Copy paper is fine
-
Insert paper in door gap
- Test at 4 locations: top, bottom, left, right
-
Close door
- Close normally
-
Pull paper
- Pull with force
| Result | Assessment | Response |
|---|---|---|
| Won’t pull out | Normal (good seal) | No problem |
| Some resistance | Monitor | Recheck in 3 months |
| Pulls out easily | Seal deterioration | Consider professional replacement |
Seal Condition Check
Visual Check- Any cracks
- Any discoloration
- Any peeling
- Press with finger to check elasticity
- Not hardened
- No stickiness
| Sign | Condition | Response |
|---|---|---|
| Hardening | Lost elasticity | Consider replacement within 1 year |
| Cracks | Surface cracks | Consider replacement within 6 months |
| Deformation | Shape collapsed | Consider immediate replacement |
Door Hinge Oiling Method
Oiling Steps (10 minutes)- Prepare commercial lubricant spray (¥500-1,000 / $3-7)
- Spray into hinge gaps
- Open/close door about 10 times
- Wipe excess oil
- Silicone spray (odorless, recommended)
- General lubricant spray
- Cost: ¥500-1,000 ($3-7)
Category 3: Lighting/Electrical Inspection (15 Minutes)
Safety check for lighting and electrical equipment.
Inspection Items and Methods
| Item | Check Method | Normal State | Abnormal Response |
|---|---|---|---|
| Lighting brightness | Turn on and check | Sufficiently bright | Replace LED |
| Lighting flicker | Behavior when on | No flicker | Replace LED |
| Outlet condition | Plug in/out | Firmly fixed | Consult professional |
| Wiring condition | Visual check | No damage | Consult professional |
LED Lighting Replacement Method (DIY Possible)
Replacement Steps (15-30 minutes)-
Safety check
- Turn off breaker
- Stabilize stepladder
-
Remove old lighting
- Remove lighting cover
- Remove lighting unit
- Check wiring (take photo)
-
Install new lighting
- Connect wiring
- Secure lighting unit
- Replace cover
-
Operation check
- Turn on breaker
- Check lighting
| Item | Cost |
|---|---|
| LED lighting | ¥5,000-15,000 ($35-100) |
| Screwdriver | Use existing |
| Stepladder | ¥3,000-8,000 ($20-55) if needed |
- Professional service: ¥15,000-30,000 ($100-200)
- DIY replacement: ¥5,000-15,000 ($35-100)
- Savings: ¥10,000-15,000 ($70-100)
Outlet/Wiring Check
Outlet Check- Plug in and out
- Firmly secured
- No looseness
- No burning smell
- Visual inspection for damage
- No exposed insulation
- No discoloration
- Don’t repair yourself
- Electrical work requires qualifications
- Consult professional immediately
Category 4: Panel/Structure Inspection (15 Minutes)
Check soundproof room structural components.
Inspection Items and Methods
| Item | Check Method | Normal State | Abnormal Response |
|---|---|---|---|
| Panel gaps | Visual, light leak check | No gaps | Record, consult professional |
| Joint looseness | Push with hand | No wobble | Tighten screws |
| Floor sinking | Walk around | No sinking | Record, consult professional |
| Wall material peeling | Visual, touch | No peeling | Record, consult professional |
Panel Gap Check
Check Method- Check inside soundproof room during daytime
- When outside is bright
- Darken inside of room
- Check for light leaks
- Take photo for record
- Consult professional
- May need additional sealant
Joint Screw Tightening Method
Tightening Steps (30 minutes)-
Prepare tool set
- Screwdriver set (¥1,000-3,000 / $7-20)
-
Check loose screws
- Push with hand to check wobble
- Focus on joint sections
-
Tighten with appropriate screwdriver
- Use correct size screwdriver
- Don’t overtighten (causes damage)
-
Check overall wobble
- Push with hand
- Make sounds to check
Floor Sinking/Tilting Check
Check Method- Walk around inside soundproof room
- Check for sinking areas
- Check for tilting sensation
- Take photo for record
- Note date
- Consult professional
- May need floor reinforcement
Environmental Measurement (10 Minutes)
Measure and record temperature and humidity.
Measurement Items and Target Values
| Item | Target Value | Tool | Abnormal Response |
|---|---|---|---|
| Temperature | 20-26°C (68-79°F) | Hygrometer | Adjust air conditioning |
| Humidity | 40-60% | Hygrometer | Dehumidify/humidify |
Hygrometer Selection
| Item | Recommendation |
|---|---|
| Type | Digital is easy to read |
| Cost | ¥2,000-5,000 ($15-35) |
| Function | Wall-mount type is convenient |
| Recording | Recording function shows trends |
Temperature/Humidity Recording Method
How to Record-
Photo with smartphone
- Photograph hygrometer daily at same time
- Auto-backup with Google Photos etc.
-
Notebook record
- Write date and temperature/humidity
- Note abnormalities in remarks
-
Spreadsheet management
- Enter in Excel or spreadsheet
- Visualize trends with graphs
- Notice abnormal changes immediately
- Understand seasonal trends
- Confirm effectiveness of measures
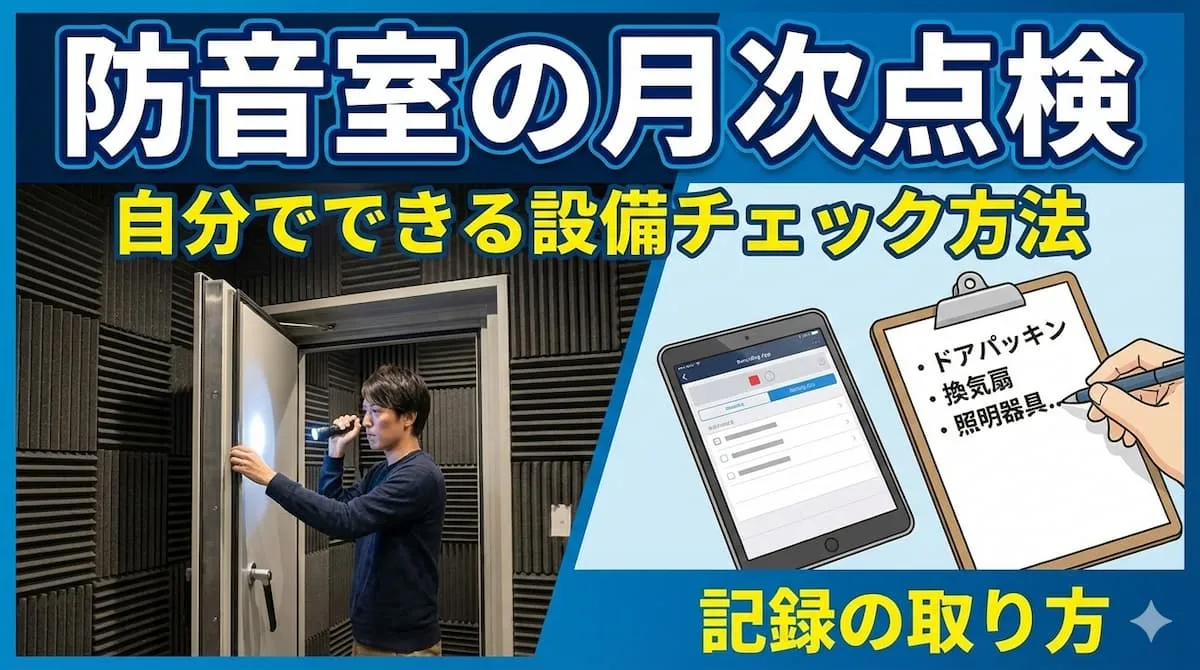
Monthly Inspection Record Sheet
Inspection Sheet Template
Copy and use the following.
【Soundproof Room Monthly Inspection Sheet】

■ Inspection Date: ____/____/____
■ Inspector: __________

【Environmental Measurement】
□ Temperature: ____°C (Target: 20-26°C / 68-79°F)
□ Humidity: ____% (Target: 40-60%)

【Ventilation/Air Conditioning】
□ Ventilation fan sound: Normal / Abnormal (        )
□ Ventilation fan airflow: Normal / Abnormal (        )
□ Filter dirt: Light / Heavy
□ Air conditioner effectiveness: Normal / Abnormal (        )
□ Condensation: None / Present (Location:        )

【Door/Seals】
□ Door opening/closing: Smooth / Squeaks / Heavy
□ Paper insertion test: Won't pull / Some resistance / Pulls easily
□ Seal condition: Normal / Monitor / Consider replacement
□ Doorknob looseness: None / Present

【Lighting/Electrical】
□ Lighting brightness: Sufficient / Dim
□ Lighting flicker: None / Present
□ Outlet condition: Normal / Abnormal (        )
□ Wiring condition: Normal / Abnormal (        )

【Panels/Structure】
□ Panel gaps: None / Present (Location:        )
□ Joint looseness: None / Present (Location:        )
□ Floor sinking: None / Present (Location:        )
□ Wall material peeling: None / Present (Location:        )

【Abnormalities/Concerns】
・
・
・

【Next Schedule】
・
・
Benefits of Record-Keeping
| Benefit | Effect |
|---|---|
| Early detection | Notice abnormalities immediately |
| Progress monitoring | Track deterioration progress |
| Useful for professional consultation | Provide specific explanations |
| Advantageous for resale | Maintenance history |
Summary: Protect Your Soundproof Room with Monthly Inspections
Let’s summarize monthly inspection points.
4 Monthly Inspection Categories
Category 1: Ventilation/Air Conditioning (15 min)- Check ventilation fan sound/airflow
- Clean filters
- Check condensation
- Paper insertion test
- Check seal condition
- Oil door hinges
- Check lighting brightness/flicker
- Check outlets/wiring
- Check panel gaps
- Tighten joint screws
- Check floor sinking
Monthly Inspection Benefits
| Benefit | Details |
|---|---|
| Early detection | Find small problems early |
| Reduce repair costs | Avoid major repairs (up to ¥420,000/$2,860) |
| Extend lifespan | 18-20 year usage possible |
| Peace of mind | Confirm no abnormalities |
Next Steps
Once comfortable with monthly inspections, move to the next level.
- Daily Maintenance: Daily and weekly cleaning methods
- Seasonal Maintenance: Spring, summer, fall, winter priorities
- Trouble Response: Sound leaks, mold, malfunction solutions
Start monthly inspections today and protect your soundproof room for years to come!