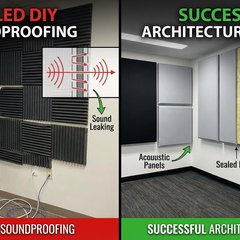
If you’ve built a DIY soundproof room but aren’t seeing the expected results, or sound leakage hasn’t improved, this guide is for you.
Most DIY soundproof room failures are caused by insufficient understanding of absorption vs. soundproofing materials, inadequate gap sealing, and insufficient ventilation. To prevent failures, advance planning and design are crucial: combine materials in the order “soundproofing → absorption”, thoroughly seal gaps, and properly install ventilation equipment. Even if you’ve already failed, improvements can be made through step-by-step solutions.
This article thoroughly explains common DIY soundproof room failures and solutions. We cover 10 failure patterns including sound leakage, insufficient performance, mold growth, and restoration issues, with specific solutions and prevention strategies.
Common DIY Soundproof Room Failures: 10 Failure Patterns#
Failure 1: Trying to Soundproof with Only Absorption Materials#
What Happens
Only using absorption materials (urethane sponge, glass wool, etc.) for soundproofing, but sound leakage doesn’t improve.
Why It Fails
- Role of Absorption Materials: Reduce indoor reverberation and eliminate sound muffling (weakens sound)
- Role of Soundproofing Materials: Prevent external sound from entering, prevent internal sound from leaking out (blocks sound)
- Problem: Absorption materials alone cannot prevent sound leakage
Specific Failure Examples
- Applied urethane sponge to walls, but sound leaks to adjacent rooms
- Filled with glass wool, but external sound enters
- Installed acoustic panels, but streaming voice leaks outside
Solutions
- Install Soundproofing Materials First: Block sound entry/exit with soundproofing sheets or gypsum board
- Add Absorption Materials Later: Add absorption materials after soundproofing to improve sound quality
- Use in Combination: Combine in the order “soundproofing → absorption”
Prevention
- Understand the difference between absorption and soundproofing materials beforehand
- Include both in the design phase
- Learn basic knowledge from specialized books or websites
Failure 2: Considering Partial Solutions Complete#
What Happens
Only implementing soundproofing on walls or windows, without addressing other areas (doors, floors, ceilings), so sound leakage doesn’t improve.
Why It Fails
- Sound Characteristics: Sound leaks from weak points (“barrel theory”)
- Limitations of Partial Solutions: If even one area is insufficient, overall effectiveness decreases
- Problem: Comprehensive solutions are needed
Specific Failure Examples
- Applied soundproofing sheets to walls, but sound leaks from doors
- Installed soundproof curtains on windows, but vibration transmits through floors
- Installed absorption materials on ceilings, but sound leaks from walls
Solutions
- Check Everything: Check walls, floors, ceilings, doors, and windows
- Set Priorities: Address areas with the most sound leakage first
- Implement Gradually: Add solutions gradually according to budget
Prevention
- Plan everything in the design phase
- List all areas with potential sound leakage
- Set priorities and implement gradually
Failure 3: Inadequate Gap Sealing#
What Happens
Installed soundproofing and absorption materials, but sound leaks through gaps (door gaps, wall joints, ventilation openings, etc.).
Why It Fails
- Impact of Gaps: Even small gaps allow sound to leak (“gaps are sound escape routes”)
- Installation Difficulty: Completely sealing gaps is difficult
- Problem: Inadequate gap sealing significantly reduces soundproofing material effectiveness
Specific Failure Examples
- Sound leaks from door gaps
- Sound leaks from wall joints
- Sound leaks from ventilation openings
- Sound leaks from electrical outlet holes
Solutions
- Identify Gaps: Check for light leakage to identify gaps
- Seal with Sealant: Seal gaps with caulking or seal tape
- Replace Gaskets: Replace door gaskets to improve sealing
- Address Ventilation Openings: Install soundproof ventilation openings
Prevention
- Plan to check for gaps before installation
- Prepare sealant materials in advance
- Check for gaps after installation
Failure 4: Inadequate Ventilation Leading to Mold Growth#
What Happens
Sealed the soundproof room but didn’t install ventilation equipment, leading to mold growth.
Why It Fails
- Impact of Sealing: Soundproof rooms have high sealing, making ventilation insufficient
- Humidity Rise: Humidity increases from breathing and sweat
- Problem: Inadequate ventilation makes mold growth likely
Specific Failure Examples
- Mold appears on walls after using the soundproof room
- Mold appears in ceiling corners
- Mold appears on absorption materials
- Condensation occurs
Solutions
- Install Ventilation Equipment: Install soundproof fans or ventilation openings
- Install Dehumidifier: Manage humidity with dehumidifier (target: 50-60%)
- Ventilate After Use: Ventilate for 10 minutes after use
- Remove Mold: Remove mold immediately if it appears
Prevention
- Include ventilation equipment in the design phase
- Prepare dehumidifier in advance
- Make post-use ventilation a habit
Failure 5: Size/Quantity Calculation Errors#
What Happens
Not accurately calculating required material sizes or quantities, resulting in insufficient materials or wasteful purchases.
Why It Fails
- Calculation Complexity: Area and material size calculations are complex
- Rough Estimates: Rough estimates lead to calculation errors
- Problem: Insufficient materials interrupt construction, wasteful purchases increase costs
Specific Failure Examples
- Insufficient glass wool, requiring additional purchases
- Gypsum board sizes don’t match, requiring cutting
- Excess soundproofing sheets, wasteful purchase
- Door sizes don’t match, cannot install
Solutions
- Create Design Drawings: Create accurate design drawings and calculate area
- 10-20% Margin: Allow 10-20% margin for materials
- Compare Multiple Sizes: Compare multiple sizes and choose optimal size
- Purchase Gradually: Purchase minimum necessary first, then add more
Prevention
- Create accurate design drawings
- Check material size charts
- Compare prices at multiple purchase locations
Failure 6: Inadequate Vibration Control, Vibration Transmits#
What Happens
Implemented air sound soundproofing but not vibration control, so vibration transmits through floors and walls.
Why It Fails
- Vibration Characteristics: Vibration differs from air sound, transmitting through structures
- Need for Vibration Control: Instruments like drums and pianos that generate vibration require vibration control
- Problem: Air sound soundproofing alone cannot prevent vibration
Specific Failure Examples
- Playing drums transmits vibration to floor below
- Playing piano makes floor resonate
- Installing bass amp transmits vibration to adjacent rooms
Solutions
- Install Vibration Mats: Place vibration mats under instruments or amps
- Floating Floor Structure: Block vibration with floating floor structure
- Vibration Isolation Units: Absorb vibration with vibration isolation units
- Adjust Volume: Reduce vibration by adjusting volume
Prevention
- Clarify purpose and determine if vibration control is needed
- Include vibration control in design phase
- Prepare vibration mats and isolation units in advance
Failure 7: Material Selection Mistakes#
What Happens
Selected low-priced materials but quality is low and effectiveness is limited, or selected materials unsuitable for purpose.
Why It Fails
- Price-Quality Relationship: Low-priced materials may have low quality
- Insufficient Understanding of Purpose: Selected materials unsuitable for purpose
- Problem: Material selection mistakes directly affect soundproofing performance
Specific Failure Examples
- Selected low-priced urethane sponge but absorption effect is limited
- Soundproofing sheet thickness insufficient, low soundproofing effect
- Glass wool density too low, limited absorption effect
Solutions
- Clarify Purpose: Select materials appropriate for purpose
- Check Quality: Check quality through reviews or specialized books
- Obtain Samples: Obtain samples if possible to verify
- Consult Specialty Stores: Consult specialty stores to select materials for your purpose
Prevention
- Understand material types and characteristics beforehand
- Compare price and quality at multiple purchase locations
- Consult specialty stores to select materials for your purpose
Failure 8: Installation Procedure Mistakes#
What Happens
Didn’t follow correct installation procedures, so installation doesn’t go well or soundproofing performance decreases.
Why It Fails
- Importance of Procedures: Not following correct procedures decreases soundproofing performance
- Lack of Knowledge: Insufficient knowledge of installation procedures
- Problem: Installation procedure mistakes may require rework
Specific Failure Examples
- Installed absorption materials first, then soundproofing materials, but effect is limited
- Installed without sealing gaps, causing sound leakage
- Installed without ventilation equipment, causing mold growth
Solutions
- Check Installation Procedures: Check installation procedures beforehand
- Implement Gradually: Proceed with installation gradually
- Refer to Specialized Books: Check installation procedures in specialized books or websites
- Consult Professionals: Consult professionals for difficult parts
Prevention
- Plan installation procedures beforehand
- Learn installation procedures from specialized books or websites
- Proceed with installation gradually
Failure 9: Restoration Issues (Rental Properties)#
What Happens
Installed DIY soundproof room in rental property, but restoration issues occur when moving out.
Why It Fails
- Insufficient Understanding of Contract: Don’t understand restoration conditions
- Installation Method Problems: Selected installation methods difficult to restore
- Problem: Restoration issues may result in high costs
Specific Failure Examples
- Drilled holes in walls for installation, repair costs incurred when moving out
- Fixed with adhesive, walls damaged when removing
- Installed soundproof materials, removal costs incurred when moving out
Solutions
- Check Contract: Check restoration conditions before moving in
- Choose Restorable Methods: Use methods that don’t require drilling, use removable materials
- Take Photos: Record initial condition with photos
- Consult Landlord: Consult landlord before installation and get permission
Prevention
- Check restoration conditions before moving in
- Choose restorable installation methods
- Consult landlord before installation and get permission
Failure 10: Considering Complete Without Effectiveness Measurement#
What Happens
Completed DIY soundproof room but didn’t measure effectiveness, so actual effectiveness is unknown.
Why It Fails
- Insufficient Effectiveness Confirmation: Consider complete based on subjective judgment without measuring effectiveness
- Measurement Difficulty: Don’t know how to measure effectiveness
- Problem: Without effectiveness measurement, improvement points are unknown
Specific Failure Examples
- Completed but actual effectiveness unknown
- Don’t know if sound leakage improved
- Don’t know if soundproofing performance meets target
Solutions
- Simple Measurement: Simple measurement with smartphone apps
- Consult Professionals: Have professionals measure effectiveness
- Check with Neighbors: Check sound leakage situation with neighbors
- Measure Continuously: Measure effectiveness regularly
Prevention
- Plan effectiveness measurement methods beforehand
- Prepare simple measurement tools
- Measure effectiveness regularly
Checklist to Prevent DIY Soundproof Room Failures#
Design/Planning Phase#
- Understand difference between absorption and soundproofing materials
- Clarify purpose and select necessary materials
- Create design drawings and calculate accurate area
- Plan everything, not just partial solutions
- Include ventilation equipment in plan
- Determine if vibration control is needed
- Check restoration conditions (for rentals)
Material Selection Phase#
- Selected materials appropriate for purpose
- Compared price and quality at multiple purchase locations
- Accurately calculated material sizes and quantities
- Purchased with 10-20% margin
- Also prepared sealant and gaskets
Installation Phase#
- Checked correct installation procedures
- Proceeding with installation gradually
- Checked gaps and sealed with sealant
- Properly installed ventilation equipment
- Implemented vibration control (if needed)
Post-Completion Confirmation#
- Measured effectiveness
- Checked for gaps
- Confirmed ventilation functions properly
- Checked sound leakage situation with neighbors
- Made post-use ventilation a habit
What to Do If You’ve Already Failed#
Improve with Step-by-Step Solutions#
Even if you’ve already failed, improvements can be made through step-by-step solutions.
Step 1: Understand Current Situation
- Identify sound leakage locations
- Measure effectiveness
- List problems
Step 2: Set Priorities
- Address areas with most sound leakage first
- Implement gradually according to budget
- Implement high-effectiveness solutions first
Step 3: Implement Solutions
- Implement gap sealing
- Add or replace materials
- Add ventilation equipment
Step 4: Confirm Effectiveness
- Measure effectiveness
- Check with neighbors
- Continue improving
Consult Professionals#
If you can’t handle it yourself, we recommend consulting professionals.
When to Consult
- Effectiveness measurement shows target not met
- Sound leakage doesn’t improve
- Mold appears
- Restoration issues occur
How to Choose Professionals
- Choose companies with track records
- Get estimates from multiple companies
- Check reviews and testimonials
- Choose companies with specialized knowledge
Summary: Key Points to Prevent DIY Soundproof Room Failures#
Most DIY soundproof room failures are caused by insufficient advance planning and design. To prevent failures, it’s important to keep the following points in mind.
3 Key Points to Prevent Failures
- Advance Planning and Design: Clarify purpose and plan everything
- Correct Material Selection: Select materials appropriate for purpose and check quality
- Correct Installation Procedures: Follow correct procedures and implement gradually
Common Failure Patterns
- Trying to soundproof with only absorption materials
- Considering partial solutions complete
- Inadequate gap sealing
- Inadequate ventilation leading to mold growth
- Size/quantity calculation errors
- Inadequate vibration control, vibration transmits
- Material selection mistakes
- Installation procedure mistakes
- Restoration issues (rental properties)
- Considering complete without effectiveness measurement
If You’ve Already Failed
- Improve with step-by-step solutions
- Consult professionals
- Measure effectiveness and continue improving
DIY soundproof rooms can be safely implemented with correct knowledge and planning. Don’t fear failure, proceed gradually, and you can achieve your ideal soundproof environment.
