
“I received a complaint from my family for late-night gaming,” or “I want to sing loudly, but I’m afraid of disturbing the neighbors.” These are the walls every streamer and creator eventually hits.
You generally have two choices: go with the convenient, off-the-shelf “Danbotchi” or a budget-friendly, custom-built “DIY Soundproof Room.”
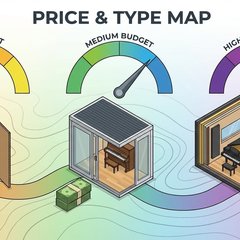
The bottom line is simple: “If you want to buy time and peace of mind, go with Danbotchi. If you want to pursue performance and cost-efficiency, go DIY.” In this article, from a studio engineer’s perspective, we will dive deep into costs, performance, and installation hurdles to help you find your perfect solution.
1. Head-to-Head: Danbotchi vs. DIY Specs#
First, let’s look at the baseline data.
| Feature | Danbotchi (Wide/Tall) | DIY Soundproof Room |
|---|---|---|
| Initial Cost | Approx. $700 - $1,100 | Approx. $150 - $450 |
| Sound Insulation | D-25 to 30 (STC 25-30) | D-25 to 40 (Depends on construction) |
| Setup Time | 1 - 2 Hours | 4 - 8 Hours + Sourcing |
| Rental-Friendly | ◎ (No damage to walls) | ○ (With proper planning) |
| Difficulty | ★ (Assembly only) | ★★★★ (Tools & Design required) |
| Pro | Manufacturer warranty & Ease of use | High performance for low cost |

2. Choosing “Danbotchi” for Instant Success#
Danbotchi is a pioneer in the “cardboard soundproof booth” market. Its greatest appeal is the speed—you can have a usable recording environment the day it arrives at your door.
Pros: Time Efficiency & Resale Value#
- Low Risk of Failure: Since it’s pre-engineered for sound absorption and insulation, you get consistent results regardless of your DIY skills.
- Resale Potential: These booths hold their value well in the secondhand market, making the effective cost lower in the long run.
- Lightweight: At roughly 30 to 50kg (66-110lbs), you don’t have to worry about floor load issues in standard apartments.
Cons: Heat and Insulation Limits#
- Temperature Build-up: Due to its airtightness, it can become a “sauna” within minutes. Additional ventilation fans are a must for long sessions.
- Targeted Frequencies: It excels at reducing mid-to-high frequencies (human voice) but struggles with low-end sounds like drums or bass.
3. Breaking Limits with the “DIY Soundproof Room”#
On the other hand, building your own soundproof room using materials from a local hardware store offers a mix of engineering fun and extreme cost-performance.
Pros: Outperforming Premade Booths on a Budget#
- Mass Equals Insulation: With a DIY build, you can use heavy-duty isolation sheets (e.g., mass-loaded vinyl) to achieve better insulation (D-35+) than a standard Danbotchi.
- Utilizing Dead Space: By converting a closet or any small nook, you can integrate a booth into your room without sacrificing floor space.
The Secret to Success: Material Strategy#
To avoid DIY failure, use this powerful combination:
- Sound Insulation Sheets: High-density sheets to bounce sound back.
- High-Density Absorption: Materials like Mineral Wool or Acoustic Foam to kill internal echoes.
4. Engineering Pro-Tip: Common Hurdles for Both Routes#
Regardless of which path you take, you must address these two critical points:
① Ventilation (A Safety Must)#
A soundproof booth is an airtight box. To prevent CO2 buildup and overheating, you need a ventilation system—ideally one with sound-dampened ducts to keep outside noise from leaking in.
② Avoiding the “Dead Room” Trap#
Small booths often absorb too much sound, making your voice sound muffled and unnatural in a recording. Adding some reflective surfaces can help create a “richer” sound for your listeners.
5. Conclusion: Which “Sanctuary” Will You Build?#
The most important factor in choosing a soundproof room is minimizing the stress that prevents you from creating.
- If you want to start streaming “right now,” choose Danbotchi. Think of it as a necessary investment to monetize as fast as possible.
- If you want to enjoy the DIY process and maximize DB reduction, choose the DIY Soundproof Room.
Whichever path you choose, the ability to perform at 100% without worrying about neighbors is worth every penny. Start building your “sanctuary” today.

※ Spec information is based on 2026 market trends. Please verify the latest prices and specifications via official retailers before purchase or construction.