Japanese DIY Soundproof Walls: Engineering Silence in 'No-Drill' Rentals
DIY soundproofing is a global passion, but Japan's strict 'Restoration to Original State' rules have led to unique innovations. Learn how to build a pro-grade, independent soundproof wall without drilling a single hole.
DIY soundproofing is a common hobby for creators worldwide. In countries like the US or many parts of Europe, where independent houses are common, a DIY approach often involves tearing down drywall, adding “Green Glue,” and installing thick “Mass Loaded Vinyl (MLV)” directly into the studs.
However, in Japan, we face a unique challenge: The Rental Contract (Genjou Kaifuku).
Most Japanese apartments strictly forbid drilling holes into the walls. This legal constraint has forced Japanese DIYers to innovate, leading to a unique “Independent Wall” structure that is both powerful and 100% removable. Today, we look at how Japanese DIY soundproofing differs from the West and how you can apply these hacks to your own space.
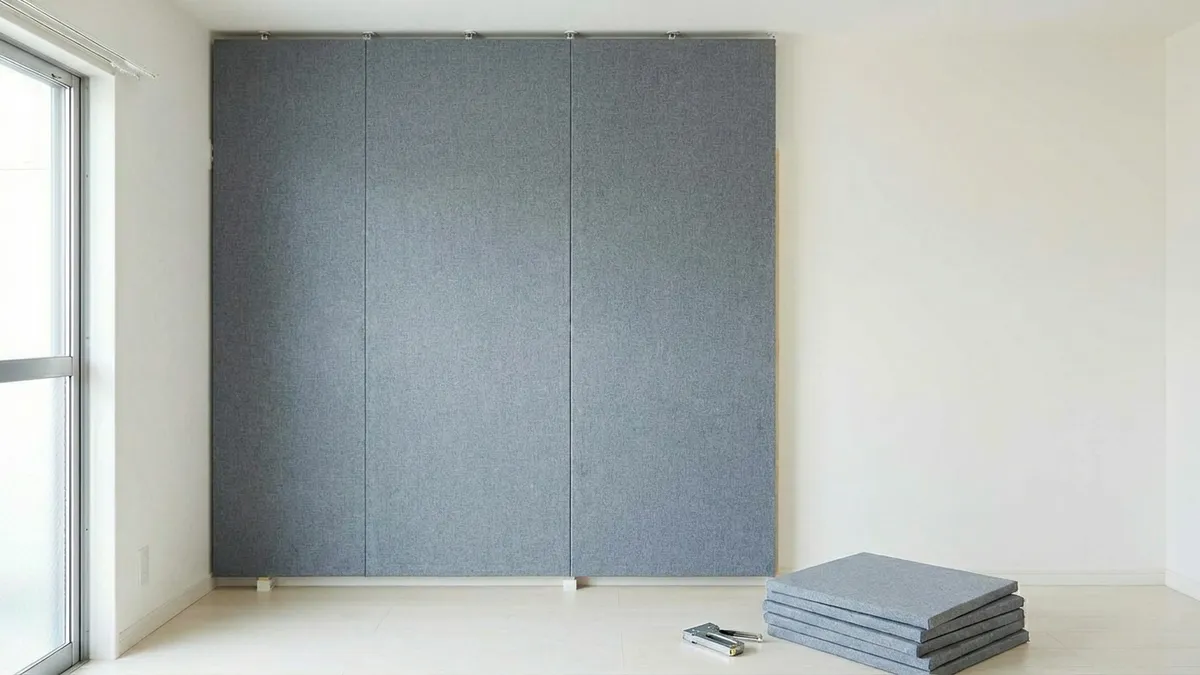
1. The Core Philosophy: “The Decoupled Independent Wall”
In the West, soundproofing is often about “adding mass” to the existing structure. In Japan, we focus on “Decoupling”—building an entirely new, free-standing wall that doesn’t touch the original one.
- Western Style : Screwing MLV and double drywall into existing studs. High mass, but rigid connection.
- Japanese Style : Using tension-based pillars (Labrico or Pillar Brackets) to create a new frame for the wall. This creates a natural “Air Gap” which is the ultimate insulator for mid-to-high frequency voices.
2. The Step-by-Step “Japanese Hack”
To build a professional-grade barrier without damaging your rental, follow this layered approach:
Step 1: The Tension Frame (Labrico)
Instead of drilling into the wall, we use 2x4 wood studs and tension adjusters like Labrico. These allow you to stand up vertical pillars anywhere in the room. We place these 2-5 cm away from the actual wall to create a decoupled air gap.
Step 2: High-Density Absorption (Rockwool)
We fill the gap between the studs with Rockwool (MG Board). In Japan, we prioritize mineral wool because it has higher density than standard acoustic foam, providing better absorption for the “rumbly” low-mids of a male voice.
Step 3: The Mass Layer (Gypsum Board)
Finally, we screw Gypsum Boards (Plasterboard) directly onto our new wood frame. Because these boards weigh about 10-15kg each, they provide the “Mass Law” isolation required to stop sound from passing through.
3. Comparison: Japan vs. Global DIY Materials
| Material | Common Global Choice | Japanese Innovation | Why? |
|---|---|---|---|
| Pillars | Screwed-in Studs | Labrico / 2x4 Adjusters | 100% no-drill, removable. |
| Mass | Green Glue + Drywall | Shizuyuka Mat / MG Board | Integrated mass and absorption sets. |
| Sealing | Acoustic Sealant | Soundproof Tape / Backing Rods | Designed for easy removal later. |
4. The Critical “1mm Rule”
Whether you are in Tokyo or London, the physics of sound remains the same. The most common DIY failure is leaving a gap at the ceiling or floor. In Japan, we use “Soundproof Caulk” or specialized “Backing Rods” to seal the perimeter of our independent wall. A 1mm gap can reduce the performance of your expensive wall by up to 30%.
Conclusion: Silence as a Movable Asset
The brilliance of the Japanese DIY method is that it treats your soundproof wall as an “Asset” rather than a renovation. When you move out, you can take the Labricos, the boards, and the Rockwool with you to your next home.
By applying the science of decoupling and mass without the permanence of screws, you can build a professional-grade sanctuary that respects both your neighbors and your landlord.
Related Articles :