DIY Soundproof Booth Blueprints | Build Your Own Danbotchi at Half Price
Save 50% on a soundproof booth by building it yourself. We provide DIY blueprints using materials from local hardware stores like plastic cardboard and timber to create a custom booth at low cost.
Are you hesitating to buy a professional soundproof booth like “Danbotchi” because of its 100,000 yen+ price tag? In Japan, you can build a similar performance booth for about 50,000 yen by combining materials easily found at local hardware stores.
In this article, I reveal the blueprints and material selection tips for a simple DIY soundproof booth I personally designed.
Why Build Your Own? Advantages and Budget for DIY Booths
The biggest advantage of DIY is achieving a “perfect fit for your room” at an “overwhelmingly low cost.”
- Cost Savings : Aim for the same sound insulation performance (-20dB) with less than half the budget.
- Customizability : Easily mount monitor arms or add extra ventilation fans.
- Satisfaction : The feeling of streaming or practicing in a space you built yourself is exceptional.
Total material costs are typically between 45,000 and 55,000 yen when using timber frames and plastic cardboard (Pladan) with sound-insulating sheets.
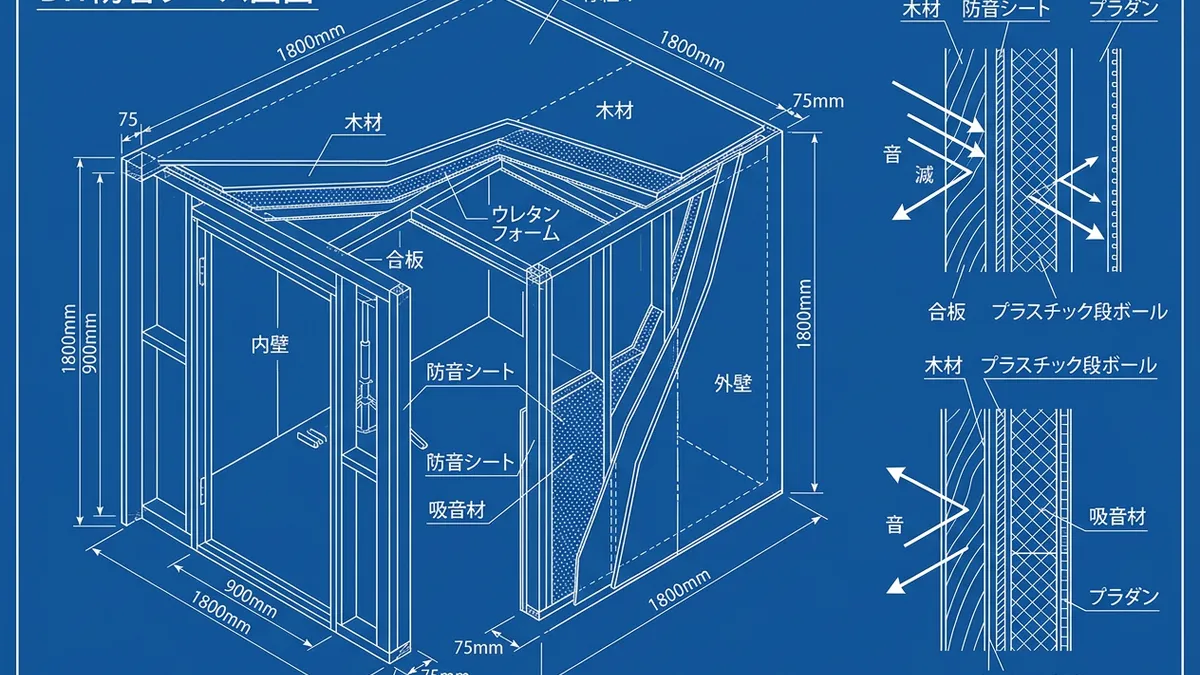
[Blueprints Revealed] Material List for a 1-Tatami Size Soundproof Booth
Here are the key points of the design, based on standard-sized timber for easy building.
- Frame : Use 30mm square cedar timber or 2x4 (Two-by-Four) lumber.
- Wall Material : Plastic cardboard (Pladan) with a thickness of 4mm or more.
- Mass (Insulation) : Sound-insulating sheets (e.g., Daiken Soundproof Sheet 455H).
- Absorption (Interior) : White Kyuon (polyester fiber) or acoustic foam.
The basic structure is a 3-layer sandwich : Timber frame -> Pladan or Plywood outside -> Sound-insulating sheet and absorption material inside.
Choosing Materials: Pladan, Timber, and Sound-Insulating Sheets
In material selection, never compromise on “mass” and “thickness.” Soundproofing performance is directly proportional to material density.
- Pladan : Do not pick thin sheets for floor protection. Choose “heavy-duty hollow structure” sheets.
- Timber : Select dry timber with minimal warping and take full advantage of the hardware store’s cutting service.
- Sound-Insulating Sheets : While online stores offer more variety, when buying locally, pick the “heavy and dense” rolls.
Choosing thin sheets just because they are cheap will result in failing to block low-frequency sounds.
Step-by-Step Assembly | Strengthening Frames and Sealing Gaps
The most critical factor in assembly is eliminating “gaps” where sound leaks.
- Frame Assembly : Secure timber with screws and reinforce corners with L-brackets.
- Wall Attachment : Fasten Pladan tightly using a staple gun (tacker).
- Use Sealing Tape : Always apply rubber weatherstripping tape to the door edges.
- Caulking : Filling joints with silicone caulk alone can improve insulation by 3-5dB.
Think of it as building a watertight box. Check from the inside to see if any light leaks through; if light gets through, sound will too.
Summary: Get Your Own “Soundproof Fortress” at Half the Price
Building your own booth takes effort, but the benefits far outweigh the cost.
- Get a professional environment for half the price.
- Custom-fit to your room without wasting space.
- Upgradable performance by adding more layers later.